Quick Answer
With inSai Hilight, you can create a virtual try-on video from a static clothing image by uploading a clean garment photo, choosing a model, selecting a shooting style and presentation style, adding optional detail notes, and generating a short try-on clip.
This workflow is best for ecommerce teams that need virtual try-on clothes content for product pages, short-form social posts, or early ad material testing before arranging a full model shoot.
Fashion teams are under pressure to launch faster, test more creative angles, and keep product pages fresh. But every new garment does not always justify a full model shoot. Booking models, matching outfits, arranging locations, and editing footage can slow down a launch when the team only needs a short try-on asset to see whether the product angle works.
That is why AI virtual try-on is useful for ecommerce. If you already have a clear clothing image, Hilight can help turn it into a virtual try-on clothing video with a real-person presentation style, so your team can create product-page visuals, TikTok or Instagram assets, and campaign test materials more quickly.
When Should You Use a Virtual Try-On Video?
Use a virtual try-on video when the buyer needs to understand how the clothing looks on a person, not only how it looks as a flat product image. This is especially useful for garments where shape, length, drape, or movement affects the purchase decision.
Use a try-on clip to support faster listing and early creative testing when a full shoot is not ready yet.
Add a short visual layer that helps shoppers understand silhouette, styling direction, and fit impression.
Create short-form assets for TikTok, Instagram, Facebook, and other channels where motion helps the garment feel more real.
Use virtual try-on clips to test which clothing, model direction, or visual style deserves more production budget.
Virtual Try-On Video vs. Static Clothing Try-On Image
The first decision is whether you need a still image or a video clip. Hilight supports different clothing visual workflows, and choosing the right one keeps the task cleaner.
If you only need a still try-on result, start with Clothing Try-On. If you need movement, walking, turning, or a more video-like try-on presentation, use Virtual Try-On Clip.
How to Create a Virtual Try-On Video in inSai Hilight
The workflow is straightforward, but the quality of the input image and model choice matter. Follow the steps below in order.
Upload a clear clothing image
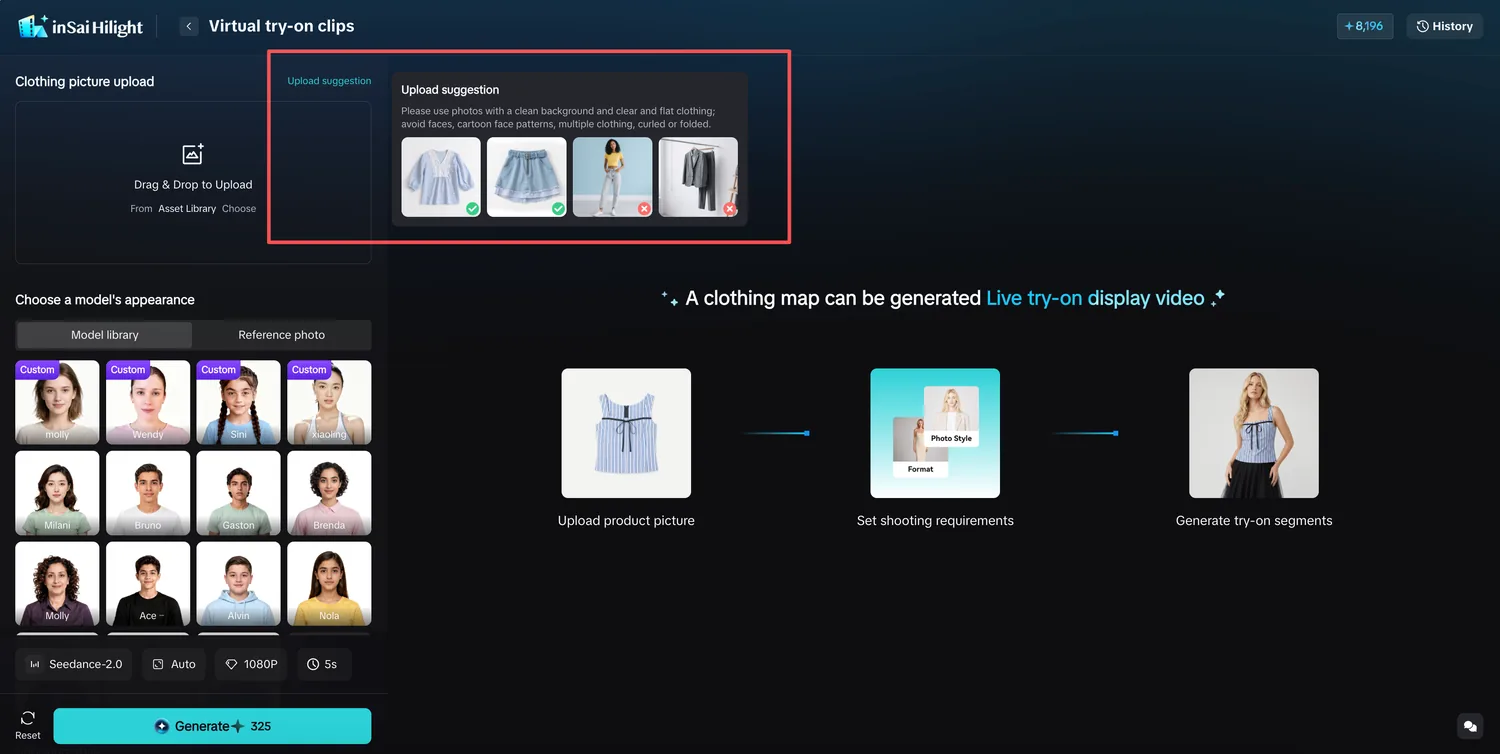
Upload the clothing image by clicking, dragging and dropping, or selecting from your asset library. The best input is a clean product photo with a simple background, complete garment edges, clear color, visible texture, and no person in the frame.
Choose a model resource
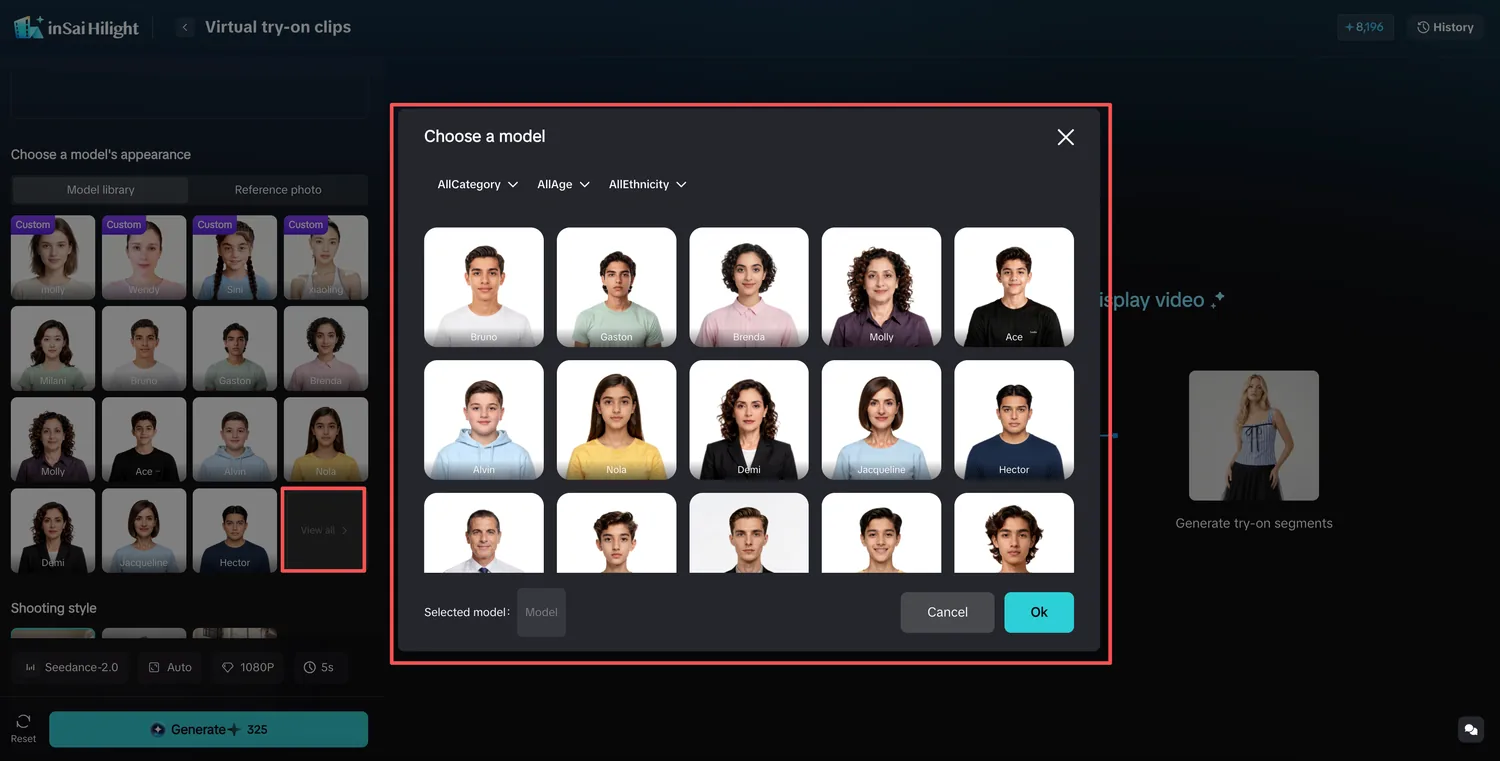
After uploading the garment, choose the try-on model. You can use the model library for a faster workflow, or upload a reference photo when you need a model pose or appearance closer to the target effect.
Select the shooting style
Choose the overall visual atmosphere. Hilight currently supports three shooting styles for this workflow: lifestyle, simple studio shoot, and fashion street style. Lifestyle works for relaxed daily outfits, simple studio shoot works for clean product-page presentation, and fashion street style works for trend-led social content or apparel ads.
Choose the presentation style
Choose how the model presents the clothing. Hilight currently supports three presentation styles: natural try-on, walking display, and turning display. Natural try-on is a safe first test for most garments. Walking display helps show length, silhouette, and motion. Turning display is useful when side or back shape matters.
Add detail close-ups if needed
Detail close-ups are optional, and you can select up to two. The current options include silhouette/profile, tailoring or cut lines, fabric texture, drape, edge treatment, and logo print. Use them only for the selling points that matter.
Write optional notes
If you have a specific direction, add it in the supplementary requirements field. Useful notes include requests such as making the motion more natural, highlighting the upper-body shape, using a European street-style feel, or avoiding an exaggerated runway look.
Choose model and output settings
At the bottom of the page, choose the generation model and set the aspect ratio, quality, and video duration. Available ratios, quality levels, and durations may change by model, and Hilight shows the available choices on the page. For short-form social video, 9:16 is usually the first format to test. For website or horizontal ad assets, 16:9 may fit better. The star-point cost changes with model, quality, and duration, so check the generation button before starting.
Generate, preview, and download
Once the clothing image, model, shooting style, presentation style, and output settings are ready, click Generate. After the result is complete, preview it on the right side and download the try-on video if it fits the direction.
What Kind of Clothing Image Works Best?
A virtual try-on clothes workflow depends heavily on the source image. Before uploading, check whether the image gives the system a clean garment to work from.
Clear garment subject, simple background, complete edges, accurate color, visible texture, and a single piece of clothing.
Blurry photos, incomplete clothing, complex backgrounds, multiple garments stacked together, large text, stickers, or watermarks.
Images with people, models, real try-on shots, celebrity photos, public-figure photos, group photos, blocked faces, or heavily retouched reference images.
For your first generation, use one clean garment image, choose a model from the library, and start with Natural Try-On before testing more specific styles.
How to Choose the Right Model, Style, and Details
AI virtual try-on clothing tools work better when the model and visual direction fit the garment. Treat this step like a small creative brief, not a random selection.

Common Mistakes That Hurt Virtual Try-On Results
If the result looks wrong, check the inputs before changing every setting. Most issues come from unclear garment images, mismatched model choices, or vague supplementary requirements.
Blur, folded edges, complex backgrounds, or stacked clothing make the try-on task harder.
For this workflow, upload the clothing itself. A real try-on image or model photo is not the ideal clothing input.
A pose or body type that does not present the clothing well can make the final clip feel off-brand or unclear.
Instead of writing only "make it better," specify the visual direction: natural motion, street-style mood, clean studio feel, or emphasis on fabric texture.
Use History to Compare and Reuse Results
After generating try-on clips, use History to view previous results, compare different models or styles, reuse earlier settings, and check tasks that are still generating. This is useful when you are testing multiple virtual try-on clothing directions for the same product.
FAQ
What is virtual try-on clothing technology?
Virtual try-on clothing technology uses AI to place a clothing item onto a model or generate a try-on presentation from a garment image. In Hilight's Virtual Try-On Clip workflow, the goal is a short try-on video, not only a static image.
Can I create virtual try-on clothes content from one image?
Yes, if the image is a clear clothing photo with a simple background and complete garment edges. For best results, the image should contain the clothing itself, not a person wearing it.
Is this a virtual try-on clothing app or a full video maker?
This tutorial focuses on the Virtual Try-On Clip workflow inside Hilight AI Studio. It is designed to create short clothing try-on clips from product images. It is not the same workflow as a full marketing video made from a product link or long campaign brief.
How should I compare AI virtual clothing try-on tools?
If you are comparing the best AI virtual clothing try-on tools in 2026, look beyond whether a tool can make a single image. For ecommerce, the more practical question is whether the workflow supports virtual try-on for online clothes with clear upload rules, model selection, shooting style choices, output settings, history, and repeatable product-page or social-content use.
Which platforms can use virtual try-on clips as source material?
You can use virtual try-on clips as source material for short-form social content on TikTok, Instagram, Facebook, product showcases, or ad material testing. Before publishing, still check product accuracy, brand fit, platform rules, and any required AI-content disclosure.
What should I do if the virtual try-on result looks unnatural?
Start by checking the garment image quality, whether the photo contains only the clothing, whether the selected model fits the garment, and whether the shooting style and presentation style match the expected result. Then adjust one or two variables and generate another version.
Final Thoughts
Virtual try-on videos are most useful when they shorten the distance between a product image and a usable ecommerce visual. They do not replace every model shoot, but they can help teams test garments, refresh product pages, and create short-form clothing assets faster.
If you start with a clean garment image, choose a suitable model, keep the shooting style aligned with the channel, and check the result before publishing, Hilight can become a practical way to create AI virtual try-on clothing content without rebuilding the whole production process each time.

