How to Create a Custom AI Avatar from a Short Video
Learn how ecommerce teams can create a reusable AI avatar from an authorized short video, then use it for talking-head videos, product explainers, and multilingual marketing content.

HiLight AI Avatar customization page: upload a short video to create a reusable digital presenter for talking-head and product videos.
For ecommerce teams, the hard part is rarely making one video. The harder part is making many videos again and again: new products, new campaigns, new languages, new hooks, and new ad angles.
A custom AI avatar helps when your content needs a person to explain something on camera, but your team does not want to arrange a new shoot every time. With HiLight, you can create an AI avatar from an authorized short video and reuse it later for talking-head videos, product explainers, multilingual content, and ecommerce video assets.
The real value is not just creating a face. It is building a reusable presenter asset that can serve multiple campaigns, markets, and platforms over time.
Key Takeaways
- A custom AI avatar turns one authorized short video into a reusable digital presenter.
- Start with clean, well-lit, single-person footage and confirm usage rights before uploading.
- Voice and language matching is critical — mismatch leads to unnatural results.
- After creation, the avatar can support both talking-head videos and product explainer videos across markets.
When an AI Avatar Makes Sense
AI avatars are useful when the video needs someone to explain information clearly. Common examples include product introductions, brand messages, campaign rules, tutorials, social media talking videos, and multilingual market content.
They are especially useful for ecommerce teams that need repeatable output: cross-border sellers creating content for many SKUs, DTC brands keeping a consistent presenter style, TikTok teams testing different scripts, and small teams without regular filming resources.
You run a cross-border ecommerce store and need to create product explainer videos for multiple SKUs. You manage a DTC brand and want a consistent on-camera presenter across campaigns. Your TikTok or Reels team needs to test different scripts and hooks quickly. Or you are a small team without regular filming resources but you need presenter-style videos.
Your main goal is to show product texture, close-up details, unboxing, or real usage — product visuals should lead, and the avatar should support the message rather than carry it. HiLight Smart Video or Asset Workshop may be a better starting point.
What to Prepare Before Creating the Avatar
Start with authorization. If you use a real person's face or voice, make sure you have permission and a clear usage scope. This is especially important for commercial content. Do not upload footage without proper authorization.
Next, prepare a clean source video. HiLight recommends a video length of 10 seconds to 3 minutes. If you want to use the voice from the video as the avatar's voice, the spoken audio should be clear and preferably longer than 10 seconds, with minimal background noise.
| Good source footage | Footage to avoid |
|---|---|
| Single person, front-facing or near front-facing | Group shots with multiple people |
| Clear, well-lit, stable video | Blurry, heavily compressed, or shaky footage |
| Simple background, minimal noise | Cluttered backgrounds or heavy background noise |
| Face fully visible and unobstructed | Blocked faces, heavy filters, or extreme side angles |
| Clean, intelligible spoken audio | Unclear or noisy audio if you plan to use the voice |
How to Create an AI Avatar in HiLight
Go to the AI Avatar page in HiLight and click to customize an avatar. The setup includes uploading the appearance, naming the avatar, choosing the voice method, and submitting the creation.
Enter AI Avatar customization
Go to the AI Avatar page and click Customize AI Avatar to start the creation flow.
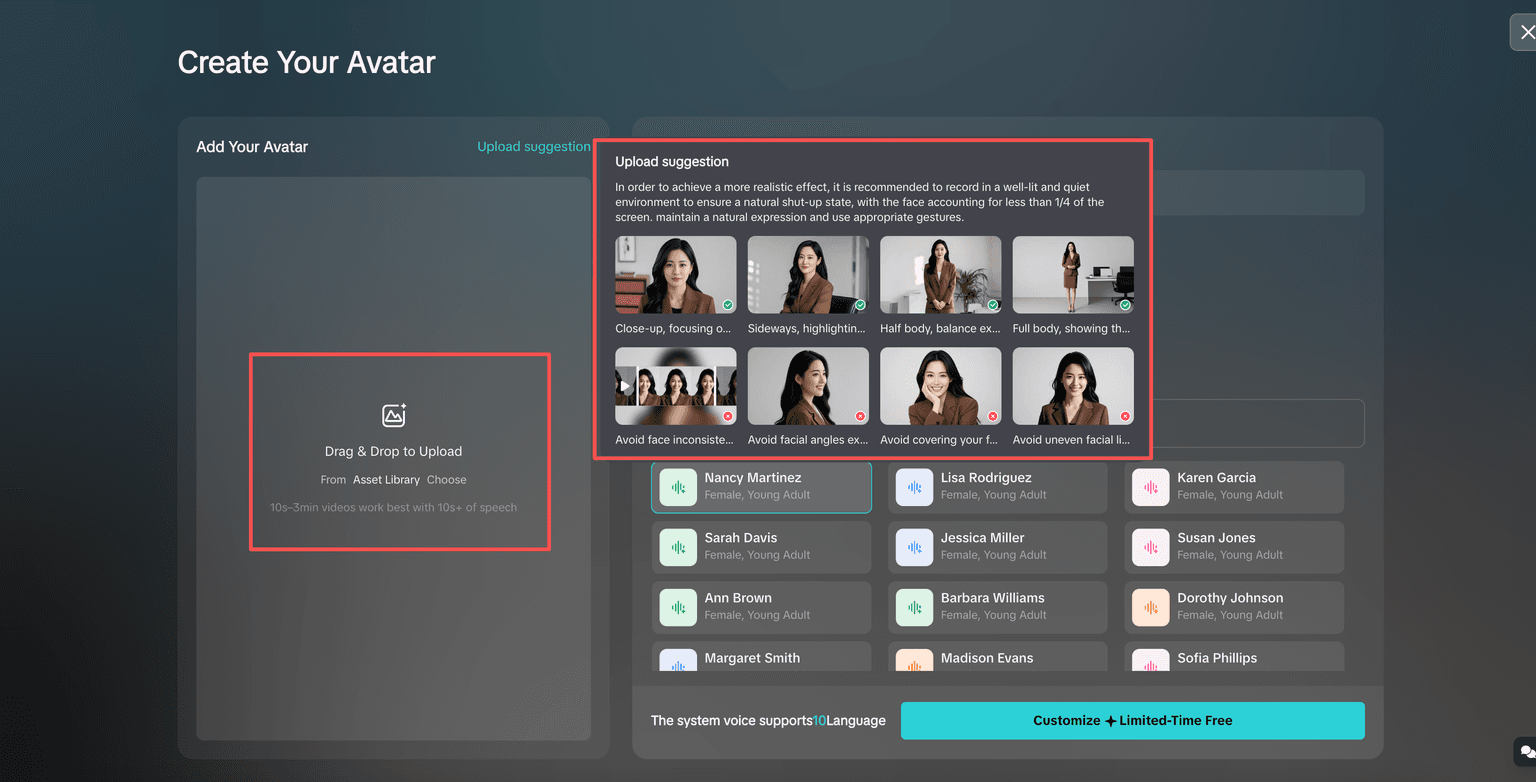
Upload the avatar appearance
Upload an image or a short video. For this workflow, a short video is the stronger choice — it gives the avatar a more presenter-like feel. After uploading, check carefully: is the person clear and complete? Is the face unobstructed? If the source is not right, replace it now.
Name the avatar for easy management
Use a practical naming convention. For example, brand name + presenter role, product line name, or language market. Clear names make it easier to find the right avatar when you have several.
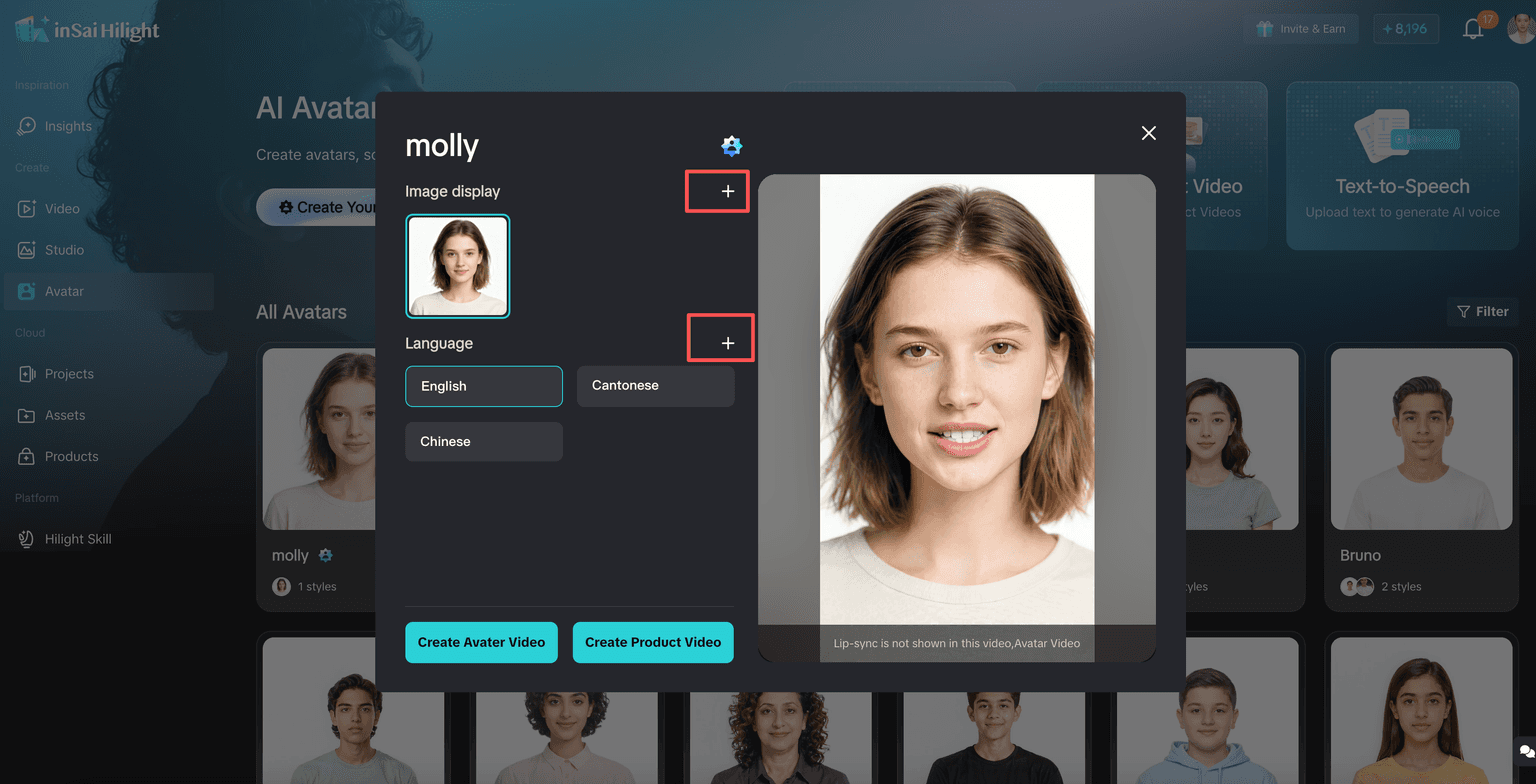
Choose the voice and match the language
You can use the video's original voice, upload a custom voice, or choose a system voice. The critical check: make sure the voice supports the language of your target video. If the voice and script language do not match, the result will feel unnatural. For English videos, use an English-capable voice. For Chinese videos, use a Chinese-capable voice.
Submit and wait for creation
Confirm the appearance, name, voice, and language settings are correct, then submit. The avatar will enter the creation process. Once ready, it will appear in your avatar list and can be used for future videos.
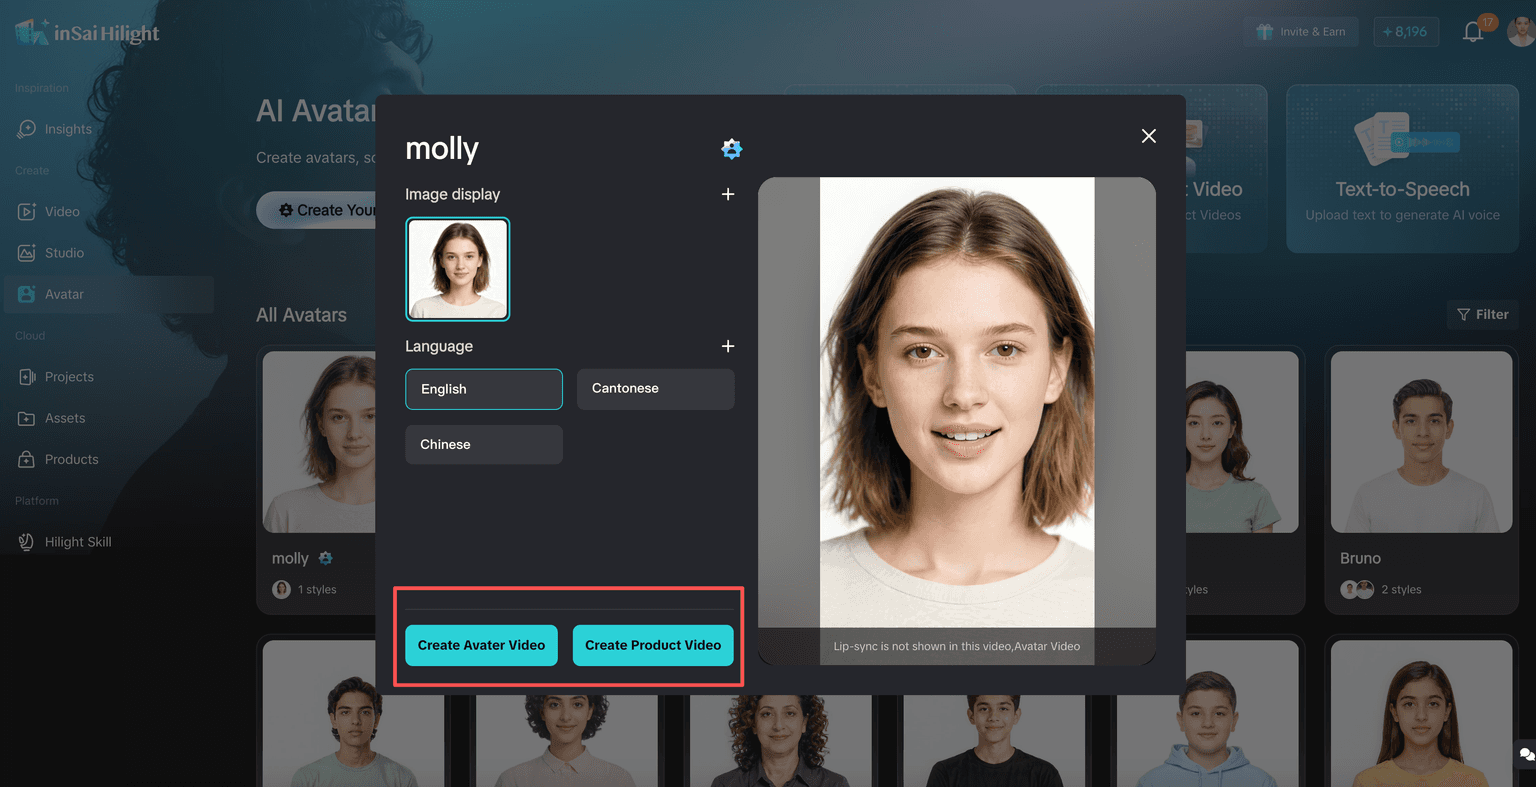
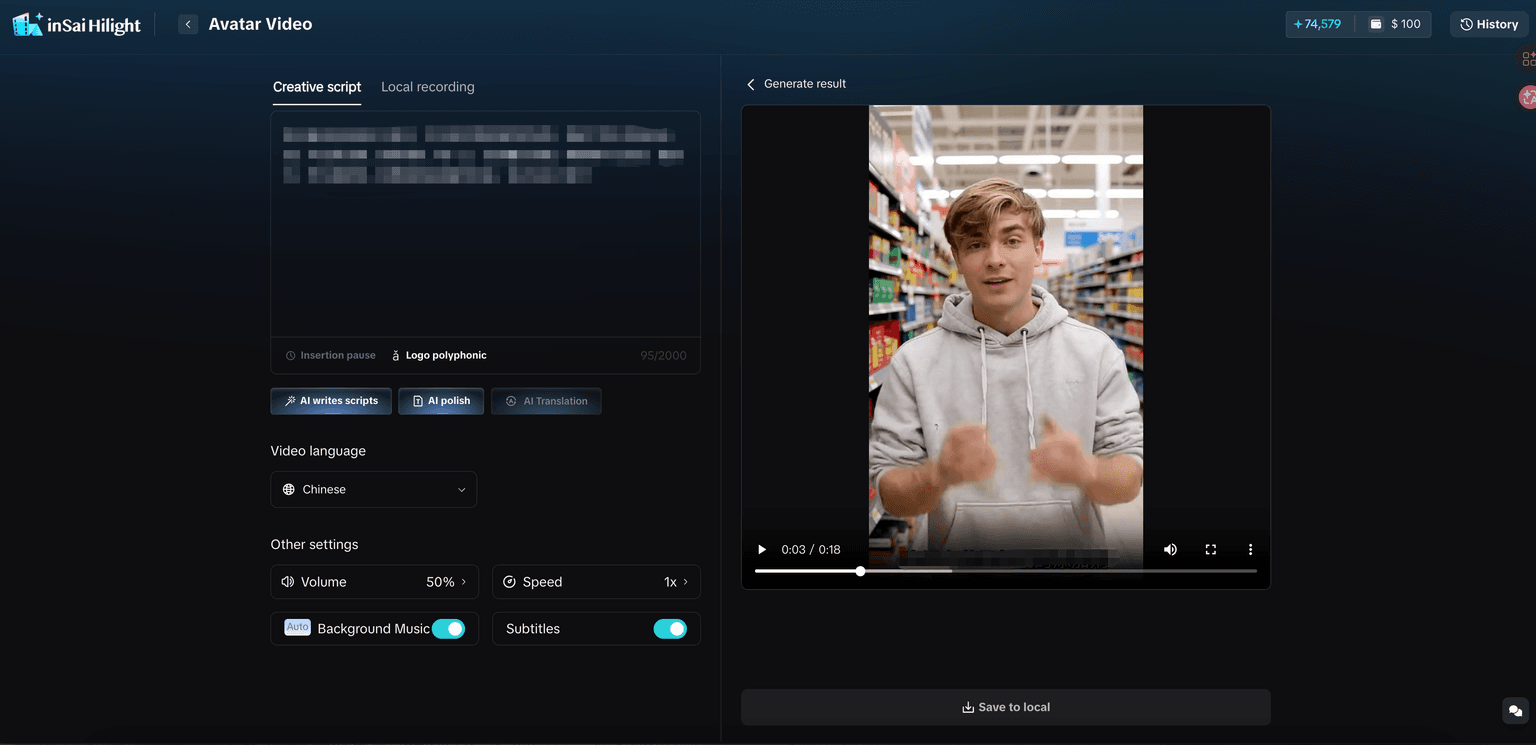
What You Can Do After the Avatar Is Created
Once your avatar is ready, there are two common directions: Avatar Video and Avatar Product Video.
Avatar Video is better for clear spoken explanation. Use it for brand intros, feature explanations, campaign notices, tutorials, and social talking videos. The focus is on the presenter delivering the message naturally.
Avatar Product Video is more product-driven. Use it when the presenter needs to connect with a product — explaining selling points, introducing a new item, or creating ecommerce-style product content. The focus is the relationship between the presenter and the product.
A simple rule: if you need to explain information, use Avatar Video. If you need to sell or demonstrate a product, use Avatar Product Video.
Tips for Better Results
A few practical details can make a noticeable difference in the final output.
- Keep scripts conversational. AI avatar videos work better when the script sounds like something a person would actually say. Short sentences, clear pauses, and one or two key points usually work better than a long product manual.
- Choose the video language before selecting the avatar and voice. Different avatars and voices may support different languages, so this step helps avoid mismatches.
- For the first test, use a short script — 15 to 30 seconds is enough. Check the avatar style, voice, speed, subtitles, and overall tone before creating a final version.
- In HiLight, you can adjust volume, speaking speed, background music, and subtitles after the initial generation. If the information density is high, enabling subtitles is recommended.
Common Mistakes
These are the four most common issues teams run into when creating their first AI avatar.
Poor lighting, blocked faces, shaky video, and noisy audio reduce the quality of the final avatar. These issues are hard to fix after creation — start with clean footage.
A digital presenter is useful for explanation, but product-heavy videos still need clear product visuals. If the video is about texture, detail, or real usage, the avatar should support rather than dominate.
Do not use someone's likeness or voice without permission. For commercial use, confirm the usage scope before uploading any person's image or voice.
For short-form video, one clear message is usually stronger than five scattered selling points. Keep scripts conversational and focused on one or two key points.
FAQ
Creation time depends on the source video length, system load, and configuration. You can monitor the status on the AI Avatar page. Once the status shows as available, the avatar is ready to use for talking-head or product videos.
Yes. In HiLight, you can add more languages to an existing avatar through the avatar detail page. Each language needs a matching voice. Confirm that the voice you select for each language actually supports that language before creating multilingual content.
A clear, stable video of a single person facing the camera, 10 seconds to 3 minutes long, with minimal background noise. If you plan to use the voice from the video, the spoken audio should be clear and preferably longer than 10 seconds. Avoid group shots, heavy filters, and cluttered backgrounds.
HiLight generates a review-ready draft, not a pre-approved final asset. Before publishing or running paid placement, check at minimum: the avatar's appearance and voice usage rights are clear, product information is accurate, claims comply with advertising regulations, and the final content meets each target platform's ad policies and AI content disclosure requirements.
If you are testing the workflow for the first time, start with a public avatar already available on the platform. If you have a clear brand image, want a consistent presenter across videos, or need the avatar to match a specific brand tone, creating a custom avatar is the better long-term choice.
Final Thoughts
Creating an AI avatar from a short video is not just a way to avoid one filming session. It is a way to create a reusable on-camera asset for ecommerce content.
With authorized footage, clean video, clear audio, a focused script, and the right voice-language match, HiLight can help teams turn one presenter setup into repeatable talking videos, product explainers, and localized marketing content. For brands creating content regularly, this matters more than any single video.
