Quick Answer
inSai Hilight's Avatar Video tool can turn either a written script or a local recording into a presenter-led talking video. Start with a system AI avatar for a quick test, or upload a character video when the presenter needs a specific appearance.
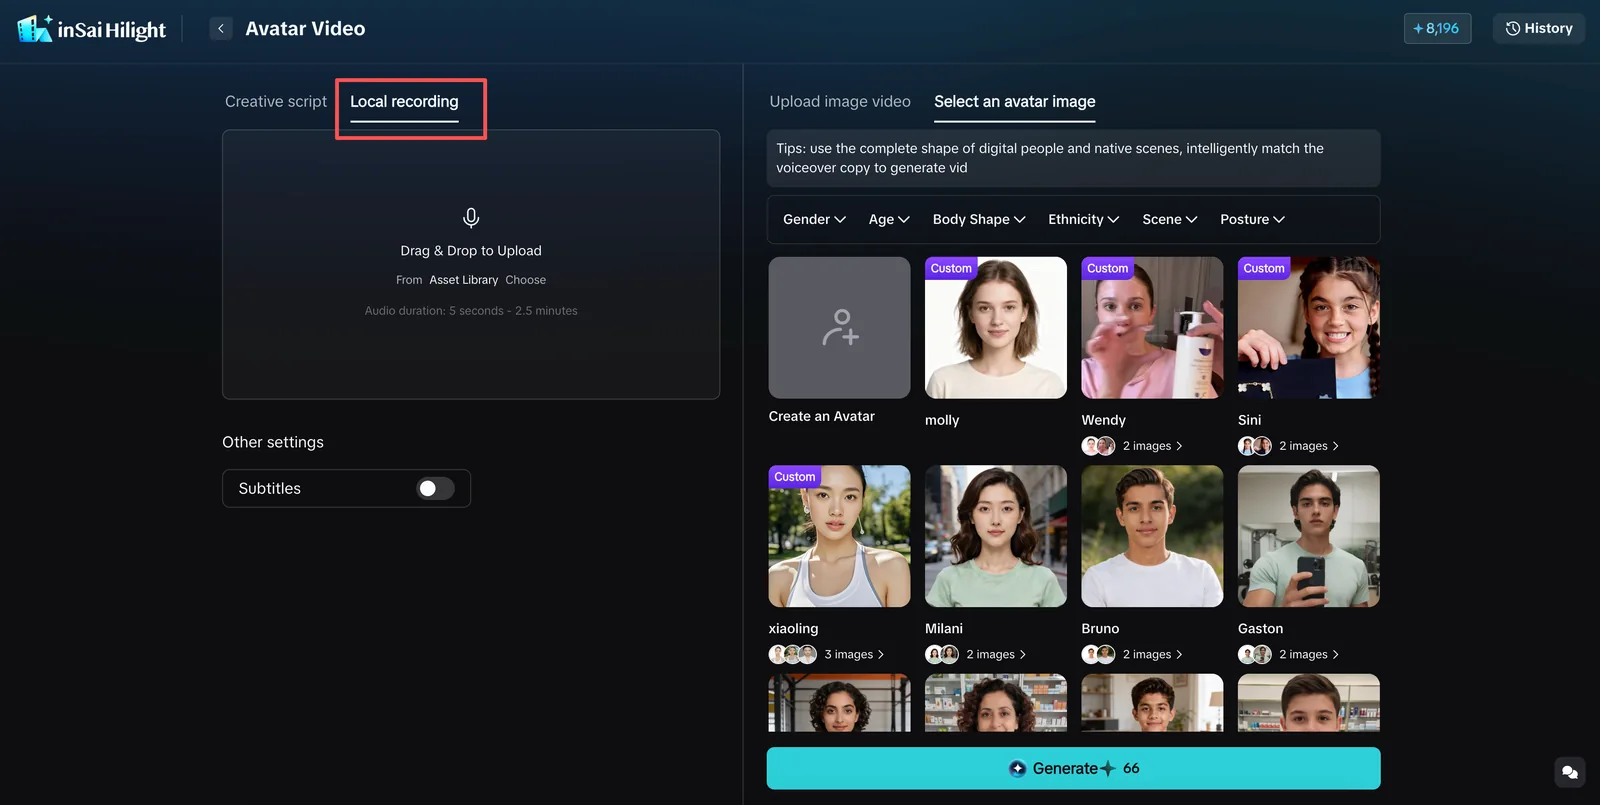
Choose Creative Script when you want Hilight to generate the speech from text. Choose Local Recording when the original voice and delivery rhythm should stay in the video. From there, match the language, presenter, and voice before adjusting speed, music, and subtitles.
A presenter-led product explanation rarely stays final for long. A price changes, a campaign date moves, a new selling point needs emphasis, or the same message has to work in another market. The difficult part is not producing the first clip, but keeping every later version clear and consistent.
This tutorial starts from two common materials: an approved script or a finished recording. It explains how each route should be set up, which input limits to check, and what to adjust first after the initial generation.
When Is an AI Avatar Talking Video the Right Choice?
An AI avatar talking video works best when the main job of the video is to let one person explain information clearly. The value comes from the delivery: viewers see a presenter, hear a focused message, and can follow the explanation without a new live-action shoot.
This workflow is useful for:
- product or service introductions
- brand and feature explanations
- campaign rules and announcements
- tutorial or onboarding content
- social media talking clips
- multilingual versions for different markets
- presenter segments for a longer edit
Use Avatar Video when the message should lead. If the product must stay visible in the presenter's hand throughout the explanation, follow the AI product presenter video tutorial instead. If the content only needs narration and no on-screen person, Text-to-Speech is usually the simpler choice.
Script or Recording: Which Input Should You Choose?
The first decision is not the avatar. It is the content source, because that choice changes how the voice is created and which settings matter later.
Creative Script is easier to revise, translate, and reuse across several versions. Local Recording is more suitable when the exact voice, emphasis, or speaking rhythm already matters.
What to Prepare Before Generation
For the Creative Script Route
Prepare a short spoken script with one clear purpose. A product explanation might name the product, explain one or two useful benefits, connect them to a real situation, and end with a simple next step.
Write for speech rather than for a product page. Shorter sentences, natural pauses, and fewer stacked claims usually sound better when delivered by an AI talking avatar.
For the Local Recording Route
Use a clear recording with complete speech and as little background noise as possible. The help documentation recommends an audio duration from 5 seconds to 2.5 minutes and a file size no larger than 20 MB.
Listen once before uploading. Check that the beginning and ending are not cut off, the volume stays reasonably even, and music or environmental noise does not compete with the speaker.
For the Presenter
You can select a system AI avatar or upload a character video. A system avatar is the simplest first test. An uploaded character video is useful when the presenter needs a specified appearance.
For an uploaded character video, use clear footage with stable lighting, a clean background, a natural expression, an unobstructed face, and limited camera shake. The supported duration is 10 seconds to 3 minutes, the maximum file size is 300 MB, the supported formats are MP4 and MOV, and the supported resolution range is 360P to 4K.
How to Create an AI Avatar Video in inSai Hilight
Once the input route is clear, complete the settings in order. For Creative Script, choose the video language before the avatar and voice so the available options stay aligned.
Step 1: Open Avatar Video and Choose the Content Source
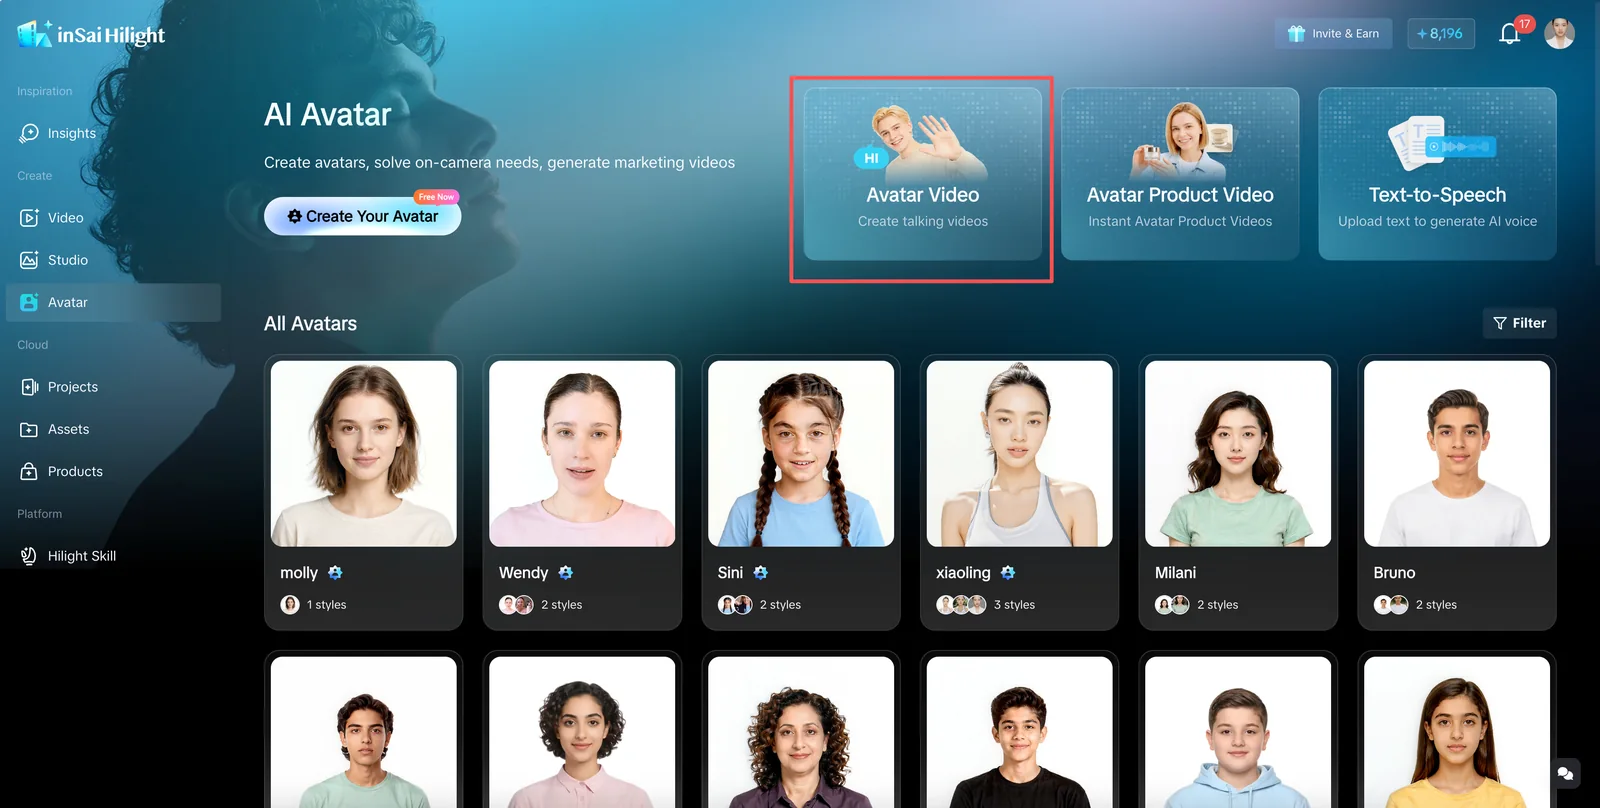
Enter the AI Avatar area and open Avatar Video. Choose Creative Script to type or paste text, or Local Recording to upload an existing audio file.
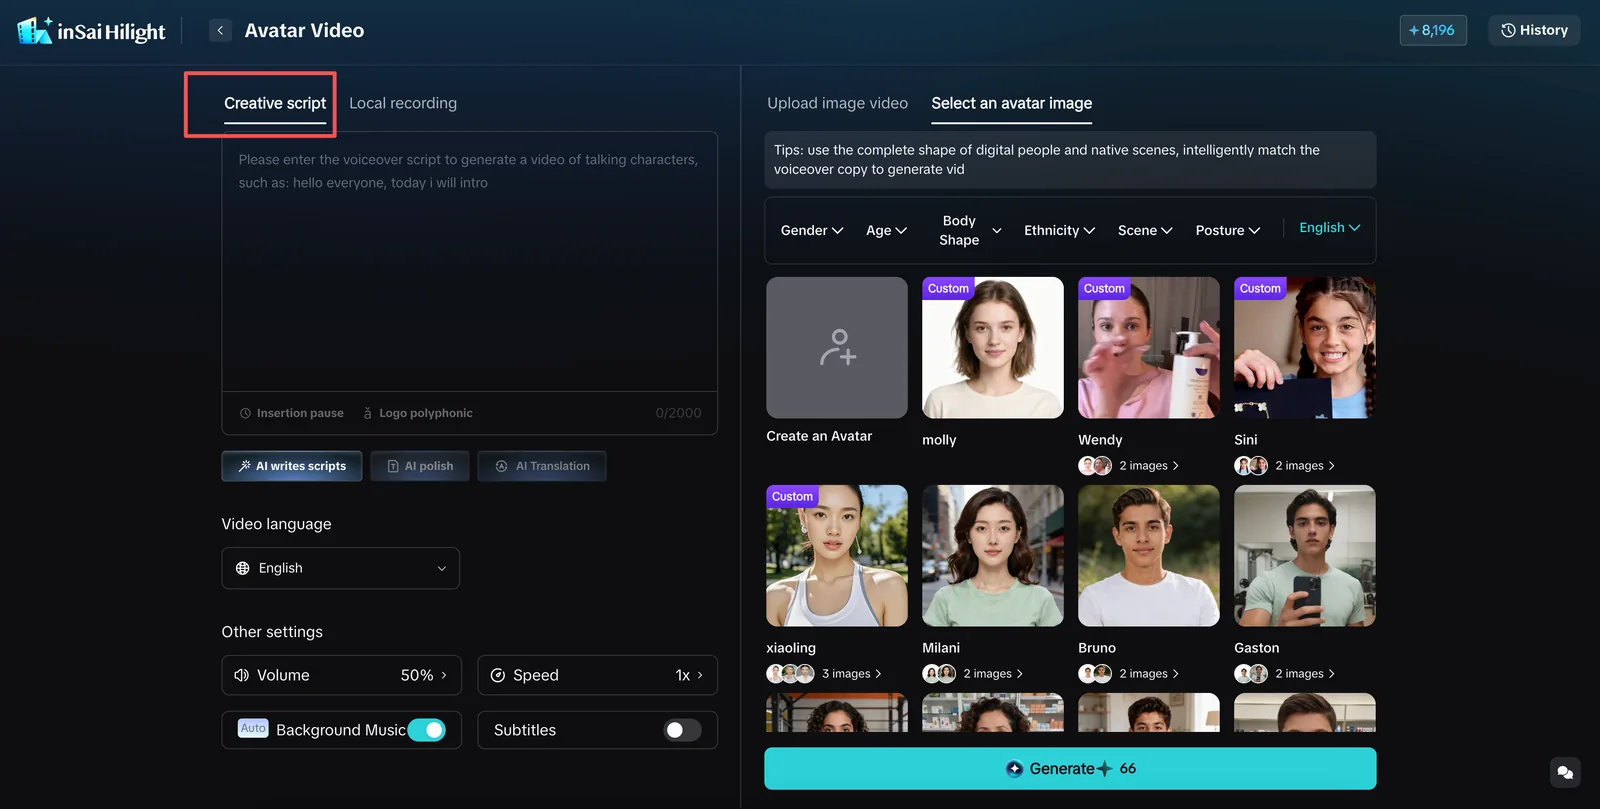
In Creative Script, you can write manually or use AI Script Writing, AI Polishing, AI Translation, Insert Pause, and Mark Polyphonic Characters. These tools can help prepare the copy, but read the final script aloud and remove wording that still feels too formal or dense.
With Local Recording, upload the audio and check that it meets the duration, size, and clarity requirements before choosing the presenter.
Step 2: Choose the Video Language for a Script
When using Creative Script, select the video language before choosing the avatar or voice. The script language and video language should match, and the selected language affects which avatars and voices appear later.
As of July 22, 2026, the avatar tools used in this tutorial support 10 languages: English, Chinese, Cantonese, Arabic, Russian, Spanish, French, Portuguese, German, and Japanese.
Step 3: Select a System Avatar or Upload a Character Video
Choose a system avatar when you want to test quickly or create several videos with a consistent ready-made presenter. Check whether the person's appearance, delivery style, supported language, and overall tone fit the content and audience.
Upload a character video when a specified presenter appearance matters. Use the upload requirements above and review the footage before generation. If the same presenter will be reused across many videos, the custom AI avatar tutorial explains how to create a reusable avatar from an authorized short video.
Step 4: Confirm How the Voice Will Be Created
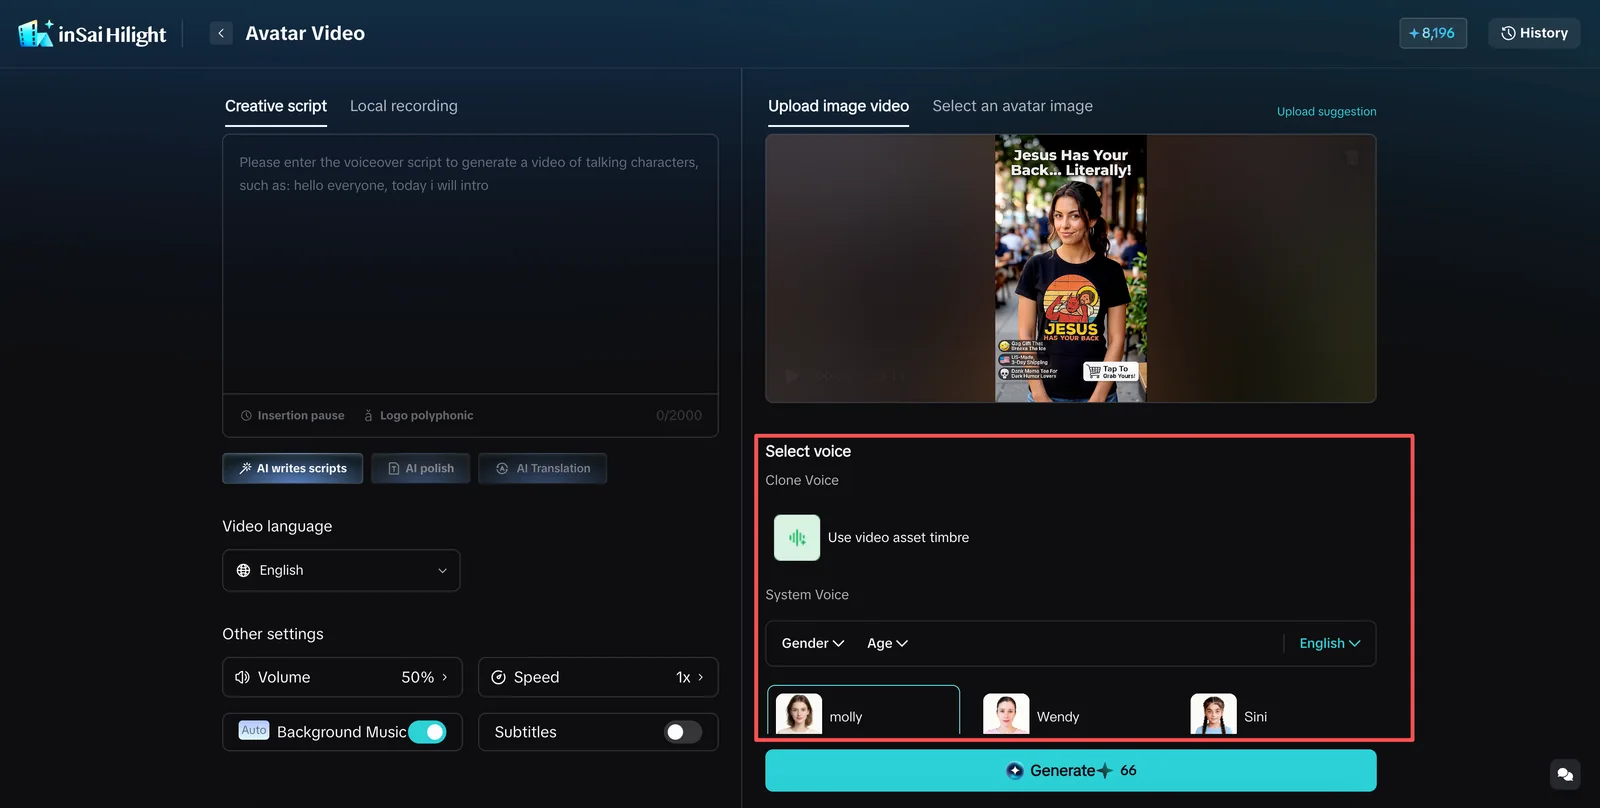
The available voice path depends on the content and presenter sources.
- With Creative Script and an uploaded character video, you can use the source video's voice or choose a system voice.
- Use the source voice when the original presenter's voice should stay recognizable.
- Use a system voice when language support or a more stable delivery is more important.
- With a system avatar, use a voice supported by that avatar and the selected language.
- With Local Recording, the uploaded recording provides the speech instead of the text-plus-voice workflow.
Preview the voice when that option is available. A voice can be technically compatible but still feel wrong for the product, audience, or message.
Step 5: Adjust Speed, Volume, Music, and Subtitles
For Creative Script, review the speaking settings before generation. Hilight supports volume, speed, background music, and subtitles. Speed can be adjusted from 0.5x to 1.5x in 0.25x increments.
For the first test, keep the default values. Increase the speed only when the delivery feels unnecessarily slow. Turn off background music when it competes with the voice, and enable subtitles when the script contains several details or the video may be watched without sound.
Step 6: Run a Final Check and Generate
Before selecting Generate, confirm that:
- the script or recording is complete and clear
- the script language matches the video language
- the avatar or uploaded character video is ready
- the selected voice supports the language
- the speed and volume feel appropriate
- background music does not cover the speech
- subtitles are enabled when they help comprehension
Generate the video, then preview the result before downloading it. If the direction is right but one detail is weak, adjust that input or setting instead of rebuilding everything at once.
What to Check in the First Generated Video
Review the first version as a communication asset, not only as an avatar demo.
- Message clarity: Can the viewer understand the main point without replaying the video?
- Presenter fit: Does the avatar match the brand, topic, and intended audience?
- Voice fit: Does the voice sound suitable for the person and the message?
- Speaking rhythm: Are the pauses and speed comfortable to follow?
- Visual quality: Is the uploaded presenter footage clear and stable?
- Listening experience: Are subtitles readable and is the music below the voice?
Change one variable at a time. Tighten the script when the delivery feels dense, change the voice when the tone is wrong, reduce the speed when words feel rushed, or replace the presenter footage when the face and lighting are unclear.
Common Problems and What to Adjust First
Shorten long sentences, remove repeated claims, and write as if one person were explaining the topic to another. Use Insert Pause where a natural break helps the delivery.
Check the video language first. The selected language changes which avatars and voices are available, so a mismatch can narrow the list or produce the wrong options.
Use a quieter recording with complete speech and more even volume. Remove long silence at the beginning or end and keep the file within the supported duration and size.
Replace the character video with clearer footage, steadier framing, stable lighting, a clean background, and an unobstructed face. Confirm its duration, format, resolution, and file size before uploading again.
Check the voice-language match, then adjust the speed. If music competes with speech, turn it off or reduce its role. Subtitles can help when the message contains names, numbers, or several steps.
FAQ
Can an AI avatar video generator start from a script?
Yes. Choose Creative Script, enter or paste the text, select the video language, presenter, and voice, then review the speaking settings before generation.
Can I use my own recording instead of an AI voice?
Yes. Choose Local Recording and upload a clear audio file. The recommended duration is 5 seconds to 2.5 minutes and the maximum file size is 20 MB.
Do I need to create a custom AI avatar first?
No. A system avatar is enough for a first test. Create a custom avatar when the same branded presenter needs to appear consistently across many videos.
Can I upload my own presenter video?
Yes. Use an MP4 or MOV file from 10 seconds to 3 minutes, no larger than 300 MB, with a supported resolution from 360P to 4K. Clear, stable, front-facing footage usually gives the workflow better source material.
How many Starlight credits does an AI avatar video use?
The cost is not fixed. It can change with the selected task and settings. Check the Starlight credit amount shown beside the Generate button before submitting, especially after changing the presenter or other generation options. The amount displayed on the current page is the estimate for that generation.
Final Thoughts
The best first AI avatar video does not need a long script or a fully customized presenter. Start with one clear message, a system avatar, and the default speaking settings. Once the delivery feels right, change the presenter, voice, language, or recording route according to the next version you actually need.

